Pages

Tuesday, March 19, 2013

DIY Cow Girl Ensemble

Yee haw!  Livy's 3rd birthday is just around the corner and thus my project timer is running wild!  

In the midst of our move, I've been slowly chipping away at the mountain of projects I set forth to see Livy's farm theme come together with as many handmade/homemade touches as possible:)

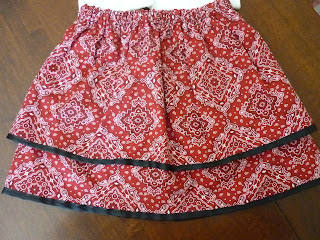
On the list was a 'cow girl' birthday outfit- I'm not much of a Western/rodeo gal so I didn't want to go crazy.


I happened upon a fabric remnant at Hobby Lobby that inspired the 2 tier skirt (my first of many to make, me thinks)...


...and the fabric choice for the silhouette cow:)

I picked up the T shirt at Gymboree during a huge sale where school uniform basics were being phased out and paid $3-4 for it; I love their quality for knits and the 'blank canvas' has been a dream to work with & saved me a chunk of time:)

For the cow, I searched for an appropriate cow silhouette online, printed and cut out.  Then I applied some fusible interfacing to the 'cow' fabric, traced my cow, cut out, and then ironed in place:)  Easy & Livy was SO excited:)


And of course, I'm chuffed to have one more thing checked off my list:)

Ensemble Cost:
Rodeo fabric: approx $2.50
Black ribbon: FREE (stash raid)
Elastic: FREE (stash raid)
Gymboree T shirt: approx $3.50
TOTAL: $6...saweet!

On to the next!

Tiffany

Wednesday, March 13, 2013

Nursemaid's Elbow

In "Lucy Fakes Illness", Lucy is convinced by "Dr. Stevenson" that she has the "Goldblatts" which "came across on the hind legs of the Booshoo bird..." and if she turns green, her "zorch" will need to be removed:)

Whenever I watch this episode, I'm reminded of far the general public has come in the past 60 yrs in their basic understanding of illnesses, medicine, healthcare etc.... 

All that to say that I was subjected to learning of a new ailment today: Nursemaid's Elbow.

My rough & tumble little boy was taken to the ER today with extreme pain in his left arm and upon admittance into the ER, the nurse said, "It looks like 'Nursemaid's Elbow' to me..."  Come to find out, that means a 'dislocation' in lay man's terms:)

Here are the facts:

"'Nursemaid's Elbow' occurs when one bone of the elbow joint is pulled out of place, and it gets stuck in that position.  This usually occurs when lifting or pulling the child by one of both arms.  Sometimes a playmate will tug hard enough on the arm to cause this injury.

The injury is due to a weakness in the ligaments of the elbow of some children at this age.  It's usually easy to correct by your doctor, but may recur if the arm is pulled again.  Ligaments strengthen by 5 years of age, and Nursemaid's Elbow will not occur after that.  It is important for parents to be aware of this, so they take care not to lift, pull, or drag the child by the arm during this age period.

After the bone is put back into position, it usually takes about 30-60 mins before the child will start using that arm normally again.  In some cases, it may take up to 24 hrs before the child starts using the arm again."

Jonah fell under the "...in some cases it may take up to 24 hrs before the child starts using the arm again..." or at least that's what we're awaiting to see!  We're off to see an orthopod in the morning with his sling in place and praying for a good report.

Lesson learned:  kids are not indestructible.  Duh.  And my little rough & tumble boy loves to swing off playground apparatus, his highchair etc... and 'Ricky' & I have not been duly diligent in containing Jonah's 'Tarzan' tendencies.  Just ask me how badly I feel, even knowing that we can't trace a specific occurrence for his injury today!  I still know of dozens of times when he could've injured himself and didn't...  So now Tarzan must become more civilized to avoid further 'Nursemaid's Elbows' as I'm NOT repeating today! 

Will Jonah still be allowed to play outside, at the playground etc...?  Yes, but we will be more diligent in helping him 'land' vs 'swing' to the ground:)  The trials of raising our little M's that continually break the mold and challenge & test 'Ricky' & I to the max...thank heaven for His angels. 

I used to listen to this song at bedtime as a young child: "They're all around me, beneath me, before me. They're all around me.  My Father's angels all around me, everywhere."  I found myself humming this as I tucked my big boy into his bed tonight, sling and all.

Be safe,
Tiffany

Friday, March 8, 2013

"The Ricardo's Change Apartments"

Ricky, "Lucy, what are all my socks doing in the desk?"
Lucy, "I put them there...I had to have more room for the baby...Ricky, I work very hard to put things away.  You just don't realize what a problem it is.  After all, I'm only human..."
Ricky, "Alright, alright.  Let's not go through all that again.. 'This apartment is too small for the two of us & Little Ricky and if we don't move I'll go crazy'".
Lucy, "Well, I'm glad you agree."

Can you relate to having your living space maxed out?  We sure can!  And after much discussion & prayer, we're finally moving:)


Our lovely little abode that has been our home for the past 6 yrs has been sold (in a miraculously short time!) and we are planning to place an offer on our potential new home this weekend:)

Our last Christmas in this home!
And since I'm in the throws of planning Livy's 3rd birthday party, I'm really stoked about being to host parties in our new home!  Simple things like Sunday family dinners, holiday celebrations, birthday parties and so much more, being hosted from our home, make me very happy:)

And yet in the midst of the celebration of a new adventure unfolding, I'm also remembering all that has taken place here in "4d"...


...we've made a lot of smoothies here...


 ...and made a lot of lunches...


...played with a lot of toys...


...enjoyed lots of arts & crafts...
 

...driven a lot of miles...


...sewn a lot of projects...


...built a lot of towers...


...made a lot of dinners for 'Ricky'...


...made & modeled a lot of hair clips...


...washed a lot of diapers...


...picked up a lot of play pasta...


...bought a lot of shoes...


...eaten a lot of strawberries with Nutella....


...baked a lot of "swee swees"...


...shared a lot of cuddles...


...taken a lot of trips...
 

...and made some wonderful memories:)

Looking forward to sharing more details soon of our new home in "3d"!

Tiffany

Thursday, March 7, 2013

Homemade Piggy Crayons

In preparation for Livy's 3rd birthday, which will arrive in just 6 short weeks (aaahhhh!), I made another "to do" list with specifics, outlining exactly what I need to work on...since it was getting a bit fuzzy:)

Task 1: Make Piggy Crayons.

Yes, we're doing a fun farm theme for Peanut's birthday this year & I can't wait!  I recently confided in Sweet Stamper that I could happily plan a farm party every year!  There's so many ideas & fun things to do with decor, activities, games....sigh.  And as much as I want to do almost all of them, I'm having to temper my creativity with practicality- we're in the midst of a move.  Need I say more?  Oh, and my little M's are wild.  That about sums it up!

So, back to the crayons.  I made a decision to forego the typical treasure laden goody bags this year due to cost, time, and lifestyle convictions and opted for something more "old fashioned"- a simple handmade favor, thanking guests for attending.  There's a growing trend towards simplicity in party favors and I was instantly drawn to it, leaving more time for cake decorating, game construction, decor etc...yippee!

I hatched a plan to make piggy crayons (think Pinterest helped inspire this project...), picked up a candy mold from Amazon and some crayons at Hobby Lobby with my 'handy dandy' coupon and set to work finding a good tutorial....that helps when you don't actually know what you're doing:)

I looked at several tutorials and then just decided to jump in as there was a lot of variance in technique.

First, Livy helped me sort the crayons into colors and then I took a knife (exacto works well too) and sliced along the wrapper- this allows the wrappers to come right off, vs digging & scraping for millions of hours:)

 
Next I took a clean sour cream container, placed the crayons (broken into pieces) inside and microwaved until melted.

TIP: I used a 'handy dandy' chop stick to stir the crayons- "green" & free!

My first batch wasn't hot enough which I discovered as I began to pour lumpy wax into my molds- I was petrified that the wax would explode in the microwave and thus erred on the conservative side...

The next batch was heated more thoroughly, allowing a cleaner entry into the molds and a nicer appearance once cool:)

Practice makes perfect and on & on until I had piggies in multiple colors.  I didn't clean out the container after each color as I was fine with some shade contrast & streaks- I've come a long way.

TIP: Due to my little M's getting antsy, I rushed in taking several rounds of crayons from the mold and discovered they lost some of their luster.  The pigs allowed to cool more completely in the mold look a bit nicer but oh well.  They're done!

Livy tried out one of the initial 'duds' and was thrilled!  She did request some chocolate piggies too though...how did she know that was next on my list?!!!

Project Costs:
Candy Mold: $5.99
Crayons: $1.58 ($5.40 for 192- I only used 56 to make 35 pigs)
Total: $7.57

I plan to include 3 pigs in each favor bag & I'm making 10 favors=  $0.14 per favor, minus the cost of the mold.  I'll be using the same pig mold to make the chocolate pigs, maximizing my investment:)

Thanks for stopping by & stay tuned for more party details & homemade projects,
Tiffany

Tuesday, March 5, 2013

Rice Pilaf with Currants & Pine Nuts

Here at the Ricardo's we eat our fair share of rice and while basic white rice is versatile, I like to vary things...  And since we're in the midst of moving, I'm seriously tackling every item in our pantry, fridge & freezer, searching for creative way to not waste anything!

This recipe was a staple when "Ricky" & I first got married but for some reason it got pushed to the back of my mind and I haven't made it in ages...until today!  Enjoy!

Rice Pilaf with Currants & Pine Nuts
(adapted from Cooks Illustrated)

Ingredients:
1 1/2 cups Basmati or Long grain white rice
1 1/2 tsp salt
Pepper to taste
2 1/4 cups water
3 tbsp butter or olive oil
1/2 cup onion, chopped finely
1/4 tsp Cinnamon
1/2 tsp Turmeric
2 garlic cloves, minced
1/2 cup dried currants
1/4 cup pine nuts, toasted

Here are some step by step instructions:


 1. Place the rice in a fine mesh strainer over a bowl and cover with water; drain the water and repeat until the water run clear, 4 to 5 times.

Tip: Yes, this step really is important as it rinses excess starch from the rice:)


2. Place butter (or olive oil) in medium, heavy bottomed saucepan, heat over medium heat until shimmering and then add onion (I used red this time & really like it).

"Sweat" (soften) the onions for approx 4 minutes but ensure they don't brown.


3.  Next, add the Cinnamon, Turmeric & garlic and saute for 1 min until the spices have "bloomed" and become very fragrant.

Set your 'handy dandy' electric kettle to boil at this point.


4. Add the rice back to the pot and combine gently with the onion & spice mixture- I prefer wooden spoons to metal/plastic.

Stir frequently for approx 3 minutes- notice the rice grains will turn translucent.


 5. Place salt & pepper in a measuring cup, top with 2 1/4 cups boiling water and pour into pot with the rice, swirling to distribute evenly.

Tip: Avoid stirring with a utensil as this draws unwanted starch from the rice making it more clumpy!


6. Bring to a boil over medium high heat, cover and reduce heat to low.  Cook for 16-18 minutes.

7. Remove the lid and place a clean kitchen towel around it.  Pour the currants over the rice (don't stir!), return the lid and steam, off the heat for 10 minutes.  No pic, sorry:(


8. Remove the lid, add the toasted pine nuts and gently fork/toss to combine! 

Tip: Never toasted pine nuts? Place them in a dry skillet over medium heat and toast for a few minutes, checking often, until fragrant and golden:)

FYI...


 If you don't have fresh garlic on hand, Penzeys has solved your predicament with their dried minced garlic- simply add a bit of water to reconstitute for approx 1 minute and add to your recipe as needed:)  I received this as a free item in one of my Penzeys orders and have used it a lot!


Warning: this rice is very addictive, especially if it's left out, so I recommend serving it immediately or portioning it out for your husband's lunch, the way I did!

Thanks for stopping by,
Tiffany