Pages

Showing posts with label Handmade Christmas gifts. Show all posts

Friday, January 10, 2014

Homemade Gluten Free Biscotti

This year, I wanted to create "Baby It's Cold Outside" themed gift baskets for my family- my thought was everyone could enjoy an evening indoors with all they would need to relax.


My little Ms helped to create the homemade GF dog biscuits & stuffed bones for their canine cousins...


...and I began making "candy cane" peppermint foot soaks,


...and then hot chocolate sticks with homemade marshmallows & ganache:)

I also chose to make biscotti to accompany the hot chocolate sticks...


...and ssshhh, they're gluten free!
 FYI, they're so good, "Ricky" couldn't even tell as he was scarfing one down:)

Gluten Free Almond Biscotti- adapted from Cooks Illustrated


Ingredients

  • 1 1/4 cups (6 1/4 ounces) whole almonds, lightly toasted
  • 1 3/4 cups (8 3/4 ounces) gluten free flour (I used Namaste)
  • 2 teaspoons baking powder
  • 1/4 teaspoon salt
  • 2 large eggs, plus 1 large white beaten with pinch salt
  • 1 cup (7 ounces) sugar
  • 4 tablespoons unsalted butter, melted and cooled
  • 1 1/2 teaspoons almond extract
  • 1/2 teaspoon vanilla extract  
  • Vegetable oil spray  

The almonds will continue to toast while the biscotti bake, so toast the nuts only until they are just fragrant. 

(I also made these with 2 tsp vanilla, omitting the almond extract- delish!)

Instructions

1. Adjust oven rack to middle position and heat oven to 325 degrees. Using ruler and pencil, draw two 8 by 3-inch rectangles, spaced 4 inches apart, on piece of parchment paper. Grease baking sheet and place parchment on it, ink side down.
2. Pulse 1 cup almonds in food processor until coarsely chopped, 8 to 10 pulses; transfer to bowl and set aside. Process remaining 1/4 cup almonds in food processor until finely ground, about 45 seconds. Add flour, baking powder, and salt; process to combine, about 15 seconds. Transfer flour mixture to second bowl. Process 2 eggs in now empty food processor until lightened in color and almost doubled in volume, about 3 minutes. With processor running, slowly add sugar until thoroughly combined, about 15 seconds. Add melted butter, almond extract, and vanilla and process until combined, about 10 seconds. Transfer egg mixture to medium bowl. Sprinkle half of flour mixture over egg mixture and, using spatula, gently fold until just combined. Add remaining flour mixture and chopped almonds and gently fold until just combined.
3. Divide batter in half. Using floured hands, form each half into 8 by 3-inch rectangle, using lines on parchment as guide. Spray each loaf lightly with oil spray. Using rubber spatula lightly coated with oil spray, smooth tops and sides of rectangles. Gently brush tops of loaves with egg white wash. Bake until loaves are golden and just beginning to crack on top, 25 to 35 minutes, rotating pan halfway through baking.
4. Let loaves cool on baking sheet for 30 minutes. Transfer loaves to cutting board. Using serrated knife, slice each loaf on slight bias into approx 1/2-inch-thick slices. Lay slices, cut side down, about 1/4 inch apart on wire rack set in rimmed baking sheet. Bake until crisp and golden brown on both sides, about 35-45 minutes, flipping slices halfway through baking. Let cool completely before serving.

 Biscotti can be stored in airtight container for up to 1 month.

(Ribbon & tags from Stampin' Up!)

These are my new fave GF treat & since they're not too sweet & contain no gluten, they're virtually guilt free!

Enjoy!
Tiffany

Sunday, January 5, 2014

Homemade Hot Chocolate Sticks


Confession: once again in my frenzy to complete this project, I neglected to take pictures so please bear with me and enjoy some that inspired me, taken by "professionals":)


To create my hot chocolate sticks,


Then I proceeded to make the ganache...mmmm.

I opted to make the ganache with bar chocolate vs chips for a superior texture but supposedly the chips work fine:)


I followed this tutorial, tweaked from the King Arthur Flour Company and it was lush!


Marshmallows & ganache complete, it was time to assemble...


This pic isn't mine, but looks just like my creations:)

 
And since I didn't have time to snap pictures, you can imagine I didn't have time to package each hot chocolate stick individually...so I grouped mine in bags of six:)


I loved this project and wasn't stressed to the limit achieving completion either!
I made the marshmallows & ganache simultaneously once my little Ms were in bed as both recipes involved "resting overnight"- perfect!
I then assembled & packaged the morning of Christmas Eve:)

So glad I took the time to try something new and I heard they tasted great- happy Mama:)


Next up: homemade biscotti, including a gluten free version!

Thanks for stopping by,
Tiffany
Saturday, January 4, 2014

Homemade Marshmallows

If you're on Pinterest at all, you've no doubt seen these:


Hot Chocolate Sticks!

I fell in love with these and since I'm not able to indulge in these while nursing Baby M, I settled for making them for my family to enjoy:)

The first step was deciding to make the marshmallows vs buying them & then deciding on a recipe...


 ...I chose this one, adapted from an Alton Brown recipe, as the tutorial is great with preferred pics...


...and they came out well despite the fact that I cooked them a bit longer than necessary due to my candy thermometer being off:/

Note to self: calibrate candy thermometer BEFORE baking!


Glossy & thick...it was a pretty sight...


...until my kitchen was covered in powdered sugar- the above pic is after I cleaned the counters! 

(Insert Bing Crosby singing "White Christmas")... if you can't have the real thing, make marshmallows!

Here's the complete tutorial that I followed:)

Stay tuned for part 2 of my homemade hot chocolate sticks:)

Tiffany

Friday, January 3, 2014

Peppermint Foot Soak

Now that I shared our homemade canine treats & toys, here's one of the people gifts:

Peppermint Foot Soak

This is a great all natural beginner project using essential oils.

Ingredients:
1 cup epsom salt
1 cup Himalayan pink sea salt
10-15 drops peppermint essential oil (therapeutic grade)

Add the essential oil to the epsom salt in a glass bowl and mix well.  Layer the epsom salt and then Himalayan salt in jars to create a candy cane effect:) 


I chose to follow this recipe, gathered my supplies...

I found the jars at the $ Store & they held approx 1 1/2 cups.


...and layered in jars:)

I found the Himalayan pink salt at Sprouts in the bulk section.


With Baby M's arrival, (more to come!) I ran out of time to make uber cute tags, thus my cheesy print outs pasted to a random sheet of red card stock...sigh...just thankful they got finished!!!

I heart the peppermint sticks & white sweater trim:)

Up next, homemade hot chocolate sticks & marshmallows!!!

Thanks for stopping by,
Tiffany

Friday, January 18, 2013

Vintage Apron

Here's another Christmas gift.  I wanted to make an apron for Leyla...


...and I found this orange print at Creative Sewing Center (LOVE!) & felt it fit the 'orange & vintagey' criteria for Leyla:)

 Next I decided to pair it with this Stampin' Up! print- perfect match!

Here is the apron pocket in progress- love the contrast of the fabrics:)

I followed the Stampin' Up! tutorial for the apron (be sure you're looking at the right one- there is a youth & adult size!) with just a few tweaks, of course:
  • I used ribbon for the belt
  • I didn't scallop the pocket
  • I added extra top stitching
This project is easy to alter so have fun with it- I would recommend enclosing the raw edges which was not specified on the tutorial.

 Here Livy was helping me make some design decisions- no frills & ruffles, since this was for a "no nonsense" girl:)


I did add the Stampin' Up! Chocolate striped ribbon for the waistband & ties and a jumbo button for the finishing touches...and did I bother to take a pic of this project, completed?  Of course not!  I completely forgot as I was rushing to get it wrapped!  Sorry:(  Hopefully you can piece it together with the pics though.

I plan on making another though...and maybe another for me- love aprons!  So many possibilities!

Thanks for looking,
Tiffany

Friday, December 28, 2012

Butcher, Baker, Candlestick Maker...

All of the above?  Why not?

A few months back, my 2 younger brothers opened their first restaurant, The Granary (with the help of their saintly wives!)- I'm IMMENSELY proud of them, so in honor of their great achievements this year, I opted for "Granary" themed Christmas gifts:)  Have I mentioned that I love, love, love themes?!!! (grin)

The first item to reside in their Christmas hampers was this:


...a butcher's diagram flour sack towel.  I was quite pleased with how these came out:)

I started with this tutorial and a trip to Hobby Lobby for the pens/embroidery hoop etc... and I got the towels at Bed Bath & Beyond- they're extra large and extra nice...not all flour sack towels are created equal:)


I initially traced with a fine tip pen but then went over again with a broader tip since I wanted 'Francis' to be a manly pig:)


 And here is the diagram, since I know you're going to want to try this out too!

I also penned 'The Granary' in the restaurant's font below the pig...accidentally deleted that pic though...grrrr.

And there you have it, Ethel!  "Next to sugar, Cuba's biggest export is ham"!!!

Thanks for stopping by,
Tiffany

Saturday, November 17, 2012

Candy Cane Lane Couture

I have loved sharing some projects featuring the Candy Cane Lane fabric from Stampin' Up! and hopefully you're not tired of these fun prints yet!  We're just getting into the holiday season so there's plenty of time to squeeze in a few more fabric projects:)


These little hair accessories came together in a snap and Livy loves them!

I made fabric circles using the Big Shot and circle dies but you could trace around a drinking glass or anything round in a pinch.

Sew a basting stitch around the perimeter, draw it up and secure- add buttons and embellish!
TIP: Stampin' Up! rhinestones can be colored with a Sharpee to make a colored gem:)

These were hot glued onto some hair clips (that I really like) from Family Dollar- Livy doesn't mind these as they're very flexible and soft so no pinching of my Peanut's locks:)


Livy wore one of these to the Wolfson House craft show yesterday and received some lovely compliments- made Mama feel awfully proud that I took the few minutes to whip these up for her:)

Thanks for stopping by,
Tiffany

Wednesday, November 7, 2012

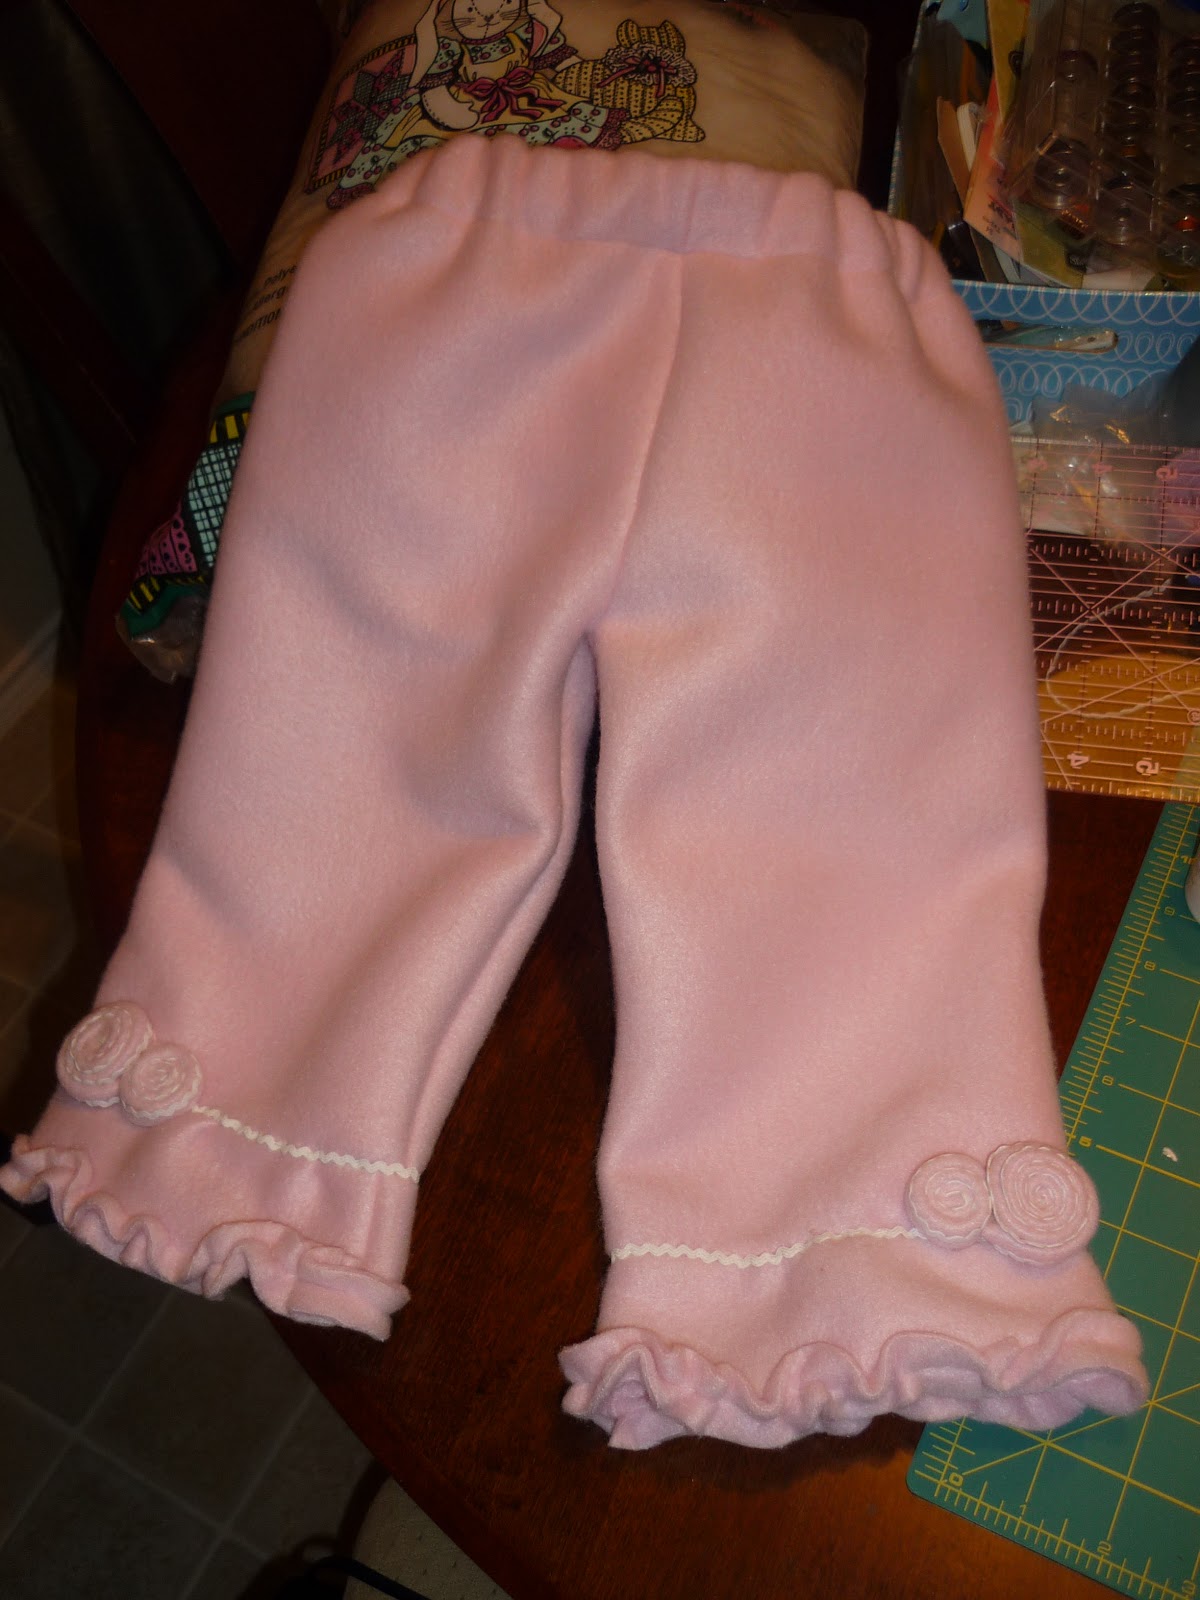
Fleece Remnant Trousers

Good morning, fellow bloggers.  With the disappointing news of the direction our country is headed for the next 4 yrs, I thought I would share some good news. I've been working on this little number for a few weeks, here and there, and it's finally done- my 1st fleece trousers!


I started with a fleece remnant found at Hobby Lobby for $1.79- sold.  Due to how the remnant was cut though, I had to do some fancy maneuvering to get trousers from it!  And since this was my first pair, made without any sort of pattern (really not needed for something this simple) I had to readjust multiple times.  I've discovered there's much less fitting for skirts vs trousers:)


I deemed this project to serve Livy as play "trouseys" (Livy calls them "foceys") but still wanted some frills to perk them up- gives me an opportunity to play and create...and learn:)

Since I was using a remnant, I scrimped and saved every bit to form rosettes and frills and added some baby white rick rack that I had on hand, for contrast- it was looking too much like cotton candy otherwise!


The rosettes were formed by knotting the end of a strip of fleece and attaching the rick rack with dabs of fabric glue, winding around and gluing until the desired size was achieved- I attached to the trousers with the same glue (need to dry for a long while!).


The waist was easy with some woven, non-roll elastic- loving elastic waists, despite the fact that I had to redo this as the original looked like a Hollywood waist, fit for Fred Mertz!!!


So here they are completed and ready for my Tornado:)


Once Livy tried them on, again, I realized that I over compensated on the length- the original length was too long so I trimmed...now they're perfect for play but just a tad short for proper fit purposes...I'm holding to the story that she grew over the past week though!


Once donned, Livy exclaimed excitedly, "Pink!" and insisted on going to "ride me bike" with her new "foceys"...


She was quite enthralled with the rosettes (aka "fowers") and kept checking to ensure they hadn't flown off during her wild riding of "me bike".


"Livy, do you like the trouseys Mama made for you?"


Livy: "Yesssss!  My Pink Foceys!"


Despite the fact that these "foceys" aren't perfect, I had a fabulous time adjusting, arranging & creating and learned a lot in the process.  And for approx $2.50, Livy has a new favorite pair of play "foceys"!

Ricky's take on this project?  "Couldn't we just buy her some so you don't have to do all this???"

In a word...no!  I'm having way too much fun!

Let me know if you have any questions- I'll be making a pair for Jonah too (minus the trim & rosettes!) so stay tuned:)

Tiffany

Friday, October 19, 2012

Candy Cane Treat Pockets


Yeah!  Today I'm sharing my 1st project using the adorable Candy Cane Lane fabric from Stampin' Up!- nostalgic and vintage charm:)


I sat down one evening once our little Ms were asleep and sewed up these little treat pockets:


They're pretty adorable, if I do say so myself and were a blast to make as they came together so quickly!


And they're easy!  In an hour I had 8 treat pockets cut out & sewn up, ready for something sweet:)

I took 2 of the striped fat quarters and cut each into 4 rectangles (pre wash & iron for best results!).  Fold them so the raw edges match (top & sides) and sew up both long sides- the bottom should be seamless.


The pinking shears made quick work of the edges adding an extra little something and just fold over the top!  I think I will add a button and maybe a Velcro dot too though...


I originally made these to hold Christmas goodies but have since decided to stash them for Jonah's next birthday (a ways off, I know!)- he's having a vintage ice cream parlor theme (can't wait!) and these will be perfect for housing goodies to send home with guests:)

Let me know if you have any questions- great beginner sewing project!

Happy crafting,

Tiffany