Pages

Monday, September 30, 2013

DIY Fall Scented Play Dough

Today I thought I'd share another Pinterest experiment: fall scented play dough.


I made green 'apple pie' & red 'cinnamon' play dough...


...and then let my little Ms loose...


...with mini muffin tins, wooden rolling pins, cupcake wrappers...


...edible Christmas trees...


...cookie cutters and molds...


...to create:) 

The original recipe for the play dough called for tempera paint but I didn't have any on hand so I used food coloring...and rubber gloves:)

Play Dough Recipe:
2 cups all purpose flour
1 cup salt
2 tbsp cream of tartar
2 tbsp vegetable oil
1 1/2 cups just boiled water

*add food coloring or tempera paint for color and spices of choice for scent.

Mix everything together in a bowl and knead for several minutes to incorporate fully- I did this on my glass stove top for easy clean up.


And after much playtime...


...it was time to clean up:/

It was well worth the effort for my little Ms to enjoy molding their play dough confections though:)

Get creative with spices using cloves, pumpkin pie, ginger, cloves, nutmeg, allspice etc...

Thanks for stopping by,
Tiffany

Tuesday, September 17, 2013

Q-Tip Painting with Homemade Paint

Over the past couple weeks I've been strategizing how to test pins on my Pinterest boards, and then deleting if I didn't feel they were successful- de-cluttering, basically:)


On my 'kids crafts' board I had pinned 'q-tip painting'...


...thus, q-tips in hand, my little Ms sat down on our handy dandy art mat (vinyl tablecloth) and began smearing & experimenting:)


Since I was trying out one pin, I opted to add another: homemade paint. 
The recipe called for equal parts of flour, salt & water plus food coloring...


...I made mine a bit thicker since I was trying to avoid excessive drips and 
 I added red gel food coloring and some ground cinnamon for added sensory delight:)


The kids had a lovely time: Livy painting with her q-tips & trying to not get messy while Jonah opted to paint himself:)

Score: Thumbs Up!

We'll definitely be doing more q-tip painting with homemade paint and working on the actual 'q-tip' technique:)

Thanks for stopping by,
Tiffany

Monday, September 9, 2013

DIY Custom Bedspread


And here is the next piece towards Livy's bedroom redo: a new DIY bedspread, my first ever:)


I started with this 100% cotton drapery material that Livy spotted on a clearance table for $4/yard...


..and then it sat, all cut & pinned for ages...not on the living room floor though...


 ...it got temporarily draped over the loveseat (as seen above)...


...as my little Ms were busy...


...playing dress up:)


And then one evening I moved the sewing machine to the dining room table and determined not to get up until this mammoth piece of cloth resembled the intended coverlet!


The cutting was a chore since this piece was the largest I had ever worked on & I did opt to round the corners- love how they turned out though vs pointy angles:)


I backed the coverlet with a high end, pique cotton, queen flat sheet that I had on hand from a set that had retired it's fitted counterpart due to wear- love the texture and crispness of the white:)

 Since we're in a warm climate, I opted for 100% cotton and nothing too thick- 
be sure to consider comfort when choosing layers:)


 Between the 2 fabric layers, I sandwiched some natural,100% cotton batting- I splurged on this when it was 50% off & so glad I did, knowing that my Peanut is getting a high quality bedspread:)

TIP: This came in a double layer off the bolt & I opted to just use one layer so I have enough batting for a second bedspread:)


 I loosely followed this tutorial and then did my own thing- I really like the top stitching around the perimeter, helping to keep the layers in place...once it's in use I may go back and add some quilting if there is much shift....


Now we're just waiting for Livy's new sheets to arrive- got this 100% cotton set from Lands End for a whopping $17.50...boo yeah!

DIY Twin Bedspread Costs:
Drapery Fabric: approx 3 yds= $12
100% Natural Cotton Batting= approx $7
Cotton Sheet: free
TOTAL: approx $19

So, for less than $20, I was able to make my "big girl" a custom bedspread that matches her new custom curtains:)


And last but not least, a sham to match the bedspread- pieces are cut and just awaiting some stitching!

Almost done...thanks for stopping by,
Tiffany

Saturday, September 7, 2013

DIY Play Tea Bags

A long while ago I pinned some pretend tea bags for play...

Pretend play tea bags for tea parties- made from fabric scraps.  Oh my!
(photo courtesy of pinterest)
...and I finally got them made last night:)

I went through my fabric stash this week, pulling all the scraps aside which served to make these...


...play tea bags:) 

I left some of them with raw edges and enclosed others, stuffing first and stuffing after sewing up the sides, not making any 2 quite the same way...it was late and I felt like experimenting:)


I opted to glue the 'tags' on the ends as my sewing machine was already griping about the tea bags:/

I dithered about saving these for a stocking stuffer...


 ...but then caved in to revealing them now:)

Livy got right down to business, allotting a bag per tea cup...


...while Jonah perked up, seeing a new toy- he was struggling with a cold:(


By this time Jonah was wanting to play...


...so little Ms. Sneaky popped all the tea bags in her teapot...


..."hiding them from Jonah"!


 Next it was time to set up her tea party guests...


...and make an "icky face" at Jonah for getting too close!


"Jonah, shoo shoo..."


Fortunately everyone had their tea and had a blast:)


So glad I took the trouble to sew up these little play tea bags- anticipating hours of fun ahead:)

Play Tea Bag Costs:
Fabric: free (stash scraps)
Polyfill: free (stash)
Mini Rope Cord: free (stash)
Fabric Glue: free (stash)
TOTAL: FREE!!!

Lucy: "Free? F.R.E.E.E.?"  The best kind of project:)

Thanks for checking in,
Tiffany

Friday, September 6, 2013

DIY Bedroom Curtains

When the Ricardo's moved to our "new big house", I opted to change Livy's bedroom decor (Beatrix Potter) which Baby M will be inheriting...


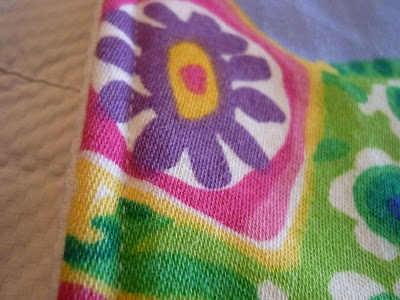
...Livy spied this bold, drapery fabric on a clearance table for $4/yard and loved it...


...so I originally planned to make a pillow pallet/nap mat with it and then realized it would make the perfect starting point for Livy's bedroom redo...


...starting with a DIY coverlet (details coming)...


...and then DIY bedroom curtains- since this fabric was drapery weight I didn't need to line them:)


I won't bother with dimensions since every window is different but I did measure a couple of times to ensure I was on track, this being my first DIY curtain adventure:)

Begin by pre-washing & ironing- this 100% cotton drapery material said "dry clean only" but I did a 'color stay' treatment in my machine with vinegar & salt and it came out fine!

Next I hemmed the sides- iron over 1/2 inch and then 1/2-1 inch more to produce an enclosed seam.

Then I hemmed the tops- iron over 1 inch & then 3 inches for an enclosed hem...


and the bottoms I hemmed by ironing over 1 inch & then 4 more for an enclosed hem- don't skimp on the hems!  I would have done an additional inch but ran out of fabric:/

I stitched just inside the 4 inch mark (upper seam) & then added a row approx 1 inch from the bottom- I did the same for the top, adjusting to the 3 inch mark, respectively.


I planned to attach ribbon loops on the back of the upper hem for the curtain rod, resulting in a more pleated look but pooped out and fortunately realized that my 'pocket' perfectly fit the curtain rod, thus going with the 'bunchy' look, which Livy doesn't mind:)


Next were the tiebacks which I initially forgot about...

...so using the scraps, I simply stitched around my rectangles, leaving a hole for turning right side out, ironed and top stitched, enclosing the hole.


I cheated by using fabric glue, attaching velcro to keep the ties closed and it's working like a charm- way easier than sewing & I glued ribbon loops on the back to attach to the wall!
SKULPTUR Finial IKEA
The curtain rod, brackets & finials came from IKEA:)


With my DIY minky bedrail cover & DIY "special" minky pillow, Livy's room redo is almost complete!

Stay tuned for details on Livy's new coverlet & sham:)

DIY Bedroom Curtain Costs:
IKEA pieces: $11
Fabric: $4/yd= approx 3 yds (I think...)
TOTAL: $23

Thanks for stopping by,
Tiffany