Pages

Showing posts with label IKEA. Show all posts

Friday, September 6, 2013

DIY Bedroom Curtains

When the Ricardo's moved to our "new big house", I opted to change Livy's bedroom decor (Beatrix Potter) which Baby M will be inheriting...


...Livy spied this bold, drapery fabric on a clearance table for $4/yard and loved it...


...so I originally planned to make a pillow pallet/nap mat with it and then realized it would make the perfect starting point for Livy's bedroom redo...


...starting with a DIY coverlet (details coming)...


...and then DIY bedroom curtains- since this fabric was drapery weight I didn't need to line them:)


I won't bother with dimensions since every window is different but I did measure a couple of times to ensure I was on track, this being my first DIY curtain adventure:)

Begin by pre-washing & ironing- this 100% cotton drapery material said "dry clean only" but I did a 'color stay' treatment in my machine with vinegar & salt and it came out fine!

Next I hemmed the sides- iron over 1/2 inch and then 1/2-1 inch more to produce an enclosed seam.

Then I hemmed the tops- iron over 1 inch & then 3 inches for an enclosed hem...


and the bottoms I hemmed by ironing over 1 inch & then 4 more for an enclosed hem- don't skimp on the hems!  I would have done an additional inch but ran out of fabric:/

I stitched just inside the 4 inch mark (upper seam) & then added a row approx 1 inch from the bottom- I did the same for the top, adjusting to the 3 inch mark, respectively.


I planned to attach ribbon loops on the back of the upper hem for the curtain rod, resulting in a more pleated look but pooped out and fortunately realized that my 'pocket' perfectly fit the curtain rod, thus going with the 'bunchy' look, which Livy doesn't mind:)


Next were the tiebacks which I initially forgot about...

...so using the scraps, I simply stitched around my rectangles, leaving a hole for turning right side out, ironed and top stitched, enclosing the hole.


I cheated by using fabric glue, attaching velcro to keep the ties closed and it's working like a charm- way easier than sewing & I glued ribbon loops on the back to attach to the wall!
SKULPTUR Finial IKEA
The curtain rod, brackets & finials came from IKEA:)


With my DIY minky bedrail cover & DIY "special" minky pillow, Livy's room redo is almost complete!

Stay tuned for details on Livy's new coverlet & sham:)

DIY Bedroom Curtain Costs:
IKEA pieces: $11
Fabric: $4/yd= approx 3 yds (I think...)
TOTAL: $23

Thanks for stopping by,
Tiffany

Friday, July 12, 2013

IKEA Window Treatments

MERETE Curtains, 1 pair IKEA Thick fabric helps to darken the room and reduce sound.
Here's an other treasure we snagged at IKEA: window treatments for the living room...


Granddaddy graciously hung these July 4th night & they've made such a lovely difference to our evolving haven:)
 

The color is listed as "brown" but it's quite olivey so it works perfectly with our furniture...

I had intended to make window treatments but these were a steal and since I have approx 14 other sewing projects in progress, I bowed to practicality & bought these!
VÄSENTLIG Finial IKEA
We also bought the hardware (rod, finials, & brackets) at IKEA for the sake of simplicity...

Cost:
Panels: $25.99 for 2
Rod: $2.99
Finials: $4.99 for 2
Brackets: $1.49
TOTAL: $74 for 2 windows!!!

Less than $75 to outfit 2 windows with double panels- sweet:)

Thanks,
Tiffany

Wednesday, July 10, 2013

Independence Day at IKEA

When I learned that "Ricky" would have July 4th off from work this year, I hatched a plan to traverse to IKEA- Granddaddy & Gramma courageously offered to ride with us and so off we went to Round Rock by way of "Bent Fork"!


We found lots of treasures (more details to come!) and while Granddaddy expertly repacked our "Cadillac convertible"...


...we commented that we might not make it through the "Holland Tunnel" so weighed down!


After playing in "Smaltown", eating "tockit cake" & exploring all the IKEA toys, Peanut was pooped!


 Granddaddy got jilted into the middle seat, forcing one foot to be straddled over the front seat armrest...


...so that Gramma could enjoy a catnap...
 

...though I'm not sure how much sleep she actually got!


My "Big Ol Boy" was feeling lousy while battling the dregs of a virus so he didn't even mind being sequestered in the rear- wasn't feeling too keen on pictures as you can see him hiding:(


When we finally made it home, Granddaddy got right down to business, hanging our new Pendant lamp...

 
 ...while "Ricky" spent a few minutes of "Daddy time", keeping our little Ms from being under foot & allowing me to unpack our treasures:)

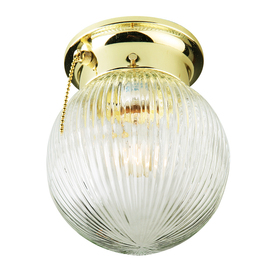
Portfolio 5-3/4-in Polished Brass Ceiling Flush Mount
I neglected to snap a picture of our 23 yr/old brass, builder grade, tacky fixture before it was removed but this is a pretty close representation...eek.


And here is our lovely new pendant light...
 

...providing a lovely glow at night that Olivia is particularly fond of:)

Cost:
Pendant: $19.99
TOTAL: <$20 for complete transformation!!!

I'm so thrilled with our lovely new IKEA pendant & especially with the price tag:)


Stay tuned for more IKEA treasures & the reveal on our new counters & kitchen sink!!!

Tiffany