Pages

Thursday, June 20, 2013

DIY Photo Canvas


I pinned this project awhile ago and planned to surprise "Ricky" with some of our wedding pics for Valentines Day...but we were in the midst of listing our home for sale so then I thought to get them ready for "Ricky's" birthday in April...but we were then buying a new home & throwing Livy's farm birthday bash...


so, they just got made...in June!  Oh well:)


I actually had to acquire all of the supplies for this project but it still was WAY more economical than buying these professionally and it made for a fun craft:)
I ordered my prints through Costco, picked up a value pack of canvases at Michaels (ages ago!) and the Mod Podge, foam brushes & paint at Hobby Lobby.


If you're a newbie like me, start by trimming your photo to fit your canvas, swipe Mod Podge over the canvas & afix your photo- allow to dry completely.


Then apply Mod Podge over the photo & allow to dry completely- be sure to keep your brush strokes uniform.  The Mod Podge will dry clear, glossy or matte, depending on your preference.


Next daub paint around the edges- I used a combination of black & bronze & an old cotton cloth.


Allow the paint to dry & then daub some more to your liking:)


Apply some picture hanging strips to the back of the canvas & hang:)

And next I need to tackle our white walls but at least I'm one project closer to completion!

Thanks for stopping by,
Tiffany

Wednesday, June 19, 2013

Bathroom Renovation...

And home renovation continues with the kid's bathroom, the only other room (besides the kitchen) adulterated with wall paper:(

Yesterday evening I put my little Ms to sleep and after a long & productive day, they fell asleep quickly, allowing me to tackle another project before bed...


...I walked by their bathroom and glared at the offending rose colored wall paper, again, and decided to have a go at peeling some away...


...well, it came off easily so I just kept peeling!  And 45 minutes later, I had all the paper down, save a few trouble spots that my growing bump wouldn't allow me to reach safely!

"Ricky" walked in from work as I was finishing and gallantly cleaned up the mess- yeah, he's a keeper:)


And so now, I'm deciding what to do on these now blank walls...texture & paint?  Re- wallpaper?  Decisions, decisions....

I would like to add some bead board and create a subtle beachy theme, focusing on lots of neutrals and some aqua accents, thereby keeping it relaxing & guest friendly- I'm not a fan of Dr. Seuss bathrooms shared by guests...but that's just me!

With the umpteen other projects going, this room might be put on the back burner but at least there is no more rose colored paper on the walls!  Another successful DIY attempt:)


Stay tuned tomorrow to check out some DIY photo canvases that I just completed:)

Tiffany

Saturday, June 15, 2013

DIY Kitchen Renovation-Counter Top Removal


So, I shared the beginnings of our DIY kitchen renovation with the removal of the wall paper- now we're tackling the counter tops:)


Granddaddy came over one afternoon (while Ricky was at work) and expertly hammered, wedged and pried apart our hideous navy tile counters and hauled off huge slabs of 'vintage' tile counters to the bin...all in an hour!  He said it was one of the easiest DIY projects he had ever tackled- good thing since there's much still to be done!


Yeah...nasty.  The counters came off in one piece though which kept the mess to a minimum with a few throw sheets placed in strategic places. And now, with the back splash removed, we're ready to finish sanding the walls...in order to apply primer:)

It's slow work but I'm (er, we!) are excited about seeing our new kitchen unfold;)


We've contracted to have the new counters professionally installed (know your limits!) but figured that we saved almost $500 by removing the old counters ourselves (er, thanks to Granddaddy!).  Yeah!


Can't wait to reveal more, but in the mean time, I'm working on a dozen different sewing/craft projects...


 ...and trying to get just one totally complete to share!

Thanks for stopping by,
Tiffany

Friday, June 14, 2013

Mrs Benson's Meat Loaf

In "The Ricardo's Change Apartments", "Lucy" & "Ethel" drop in on "Mrs Benson" to convince her to switch apartments and are greeted with, "Come in, come in.  I was just mixing a meatloaf."  Simple, pure domesticity, at its best:)


Well, as I'm still in the unpacking stage with our new home, I haven't had much inspiration for dinner...and yet, meatloaf always sounds good...that is, good meatloaf;)

After doing a little research on meatloaf, I was introduced to 'meatloaf mix' which is ground beef, ground pork & ground veal, in equal proportions- evidently this used to be standard fare at the "market" but no longer is available in most places...at least here.


So one morning during our weekly shopping run, I snagged some quick sale all natural ground veal & organic ground beef and popped them in the freezer until I was ready to assemble my 'proper' meatloaf:)

Ingredients all in place, this is the recipe I used, courtesy of Cook's Country- it's SO good & I just love the mini loaves:)

30 Minute Meat Loaf
Ingredients:
 2/3 cup crushed Saltine crackers (17 crackers)
1/4 cup whole milk
3 tbsp Worcestershire sauce
1/3 cup chopped fresh parsley
1 1/2 tbsp Dijon mustard
1 large egg
1 tsp onion powder
1 tsp garlic powder
1/8 tsp cayenne pepper
1/2 tsp salt
1/2 tsp pepper
1 1/2 pounds meatload mix
2 tsp vegetable oil
Glaze:
1/2 cup ketchup
1/4 cup packed light brown sugar
4 tsp cider vinegar

1. Adjust oven rack to middle position, place a broiler pan with a slotted top on the oven rack & heat to 500 degrees.
2. Mix the crackers, Worcestershire sauce, parsley, mustard, egg, onion powder, garlic powder, cayenne, salt & pepper in large bowl.  Add the meat and mix by hand until evenly combined.  Form into 4 tightly packed loaves, each measuring 4 by 3 inches.


3. Heat the oil in a large nonstick skillet over medium-high heat until just smoking.  Cook the loaves until well browned on the top & bottom, 2-3 minutes per side.


4. For The Glaze: While the meat is browning, combine all the glaze ingredients in a bowl.


5. Carefully transfer the loaves to the slotted broiler- pan top and spoon 1 tbsp glaze over each loaf.  Bake until an instant read thermometer inserted in the middle of a loaf reads 160 degrees, 7 to 9 minutes.  Let the loaves rest on the broiler pan 3 minutes.  Serve passing the extra glaze.


I have now made this recipe twice.  The first go around, I served the meat loaf with jacket potatoes and sauteed kale & red onions:)

The second go around, I served the meat loaf with Crispy Potato fans and a baby Romaine salad with Blue Cheese dressing:)

Scrumdiddlyumptious both times!!! 

"Lucy" remarks to "Mrs Benson", "Smells great!" & I guarantee your family will state the same!

Hope you enjoy:) 
Tiffany

Sunday, June 9, 2013

Our "Garden of Eden"

As I've gotten older, I've come to find great joy in glancing out into our garden to see an array of plants & flowers welcoming feathered & furry friends.  


"Ricky" worked hard to add plants to our old house and I found myself wondering how I could bear to leave these little seedlings that were now blooming and maturing...


...and then I viewed our new home...


...a veritable 'Garden of Eden!!!


 ...and discovered a "secret garden" on the side of the house...


...with a bench swing...


 ...and home to beauties like this Turks Cap...


...and this heavenly Gardenia:)


On the other side of the house is a "Pixie Hollow" entry...


 ...revealing a plethora of ground cover...


...Nandinas, including berries "for the baby red birds"...


...Plumbagos that are just starting to bloom...


...a Bougainvillea...


...Lantana...


 ...Mexican Heather...


...and this mysterious plant with blue blossoms.


There is a herb garden with Lemon Verbena, Chives & Rosemary thriving... 


...and we've discovered a Banana tree and some Blackberry bushes too:)

Photo: Beautiful morning:)

Our little Ms are loving all the shade and their swing set just barely fits amidst all the landscaping & trees!

What a blessing to inherit this "Garden of Eden"- I'm basking in its glory each time I look out the window and Jonah squawks with delight at the myriad of God's creation deposited in our new home:)

Have a great Sunday,
Tiffany

Saturday, June 8, 2013

Vintage Wallpaper

"Ricky" & I are so blessed to be in our new home, however we had been in a brand new builder grade home for the past 6 years and our new home is 23 years old & hadn't received much, if any, updating:/


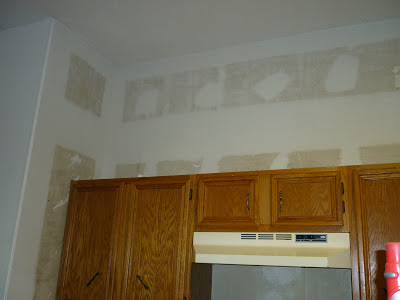
 One of the main eye sores was the 'vintage' wall paper in the kitchen...


 So after convincing "Ricky" that the kitchen needed a DIY intervention, the scouring began (this step made a big difference)!


 And then "Ricky" selflessly steamed (Home Depot rental) & stripped the vestiges of 'vintage' paper off our new walls...


 ...to reveal this!  
The next weekend, the walls were sanded and now are awaiting some texture, primer & paint which has been put on hold as we tackle having the counters replaced...


...so in the mean time, we've tackled some other vintage remnants like this kitchen fixture.  Not my taste:(


Granddaddy graciously came to help install this while "Ricky" sanded away on the walls- much better for a basic kitchen fixture:)

And now we're awaiting estimates for our new counters & are planning the cabinet makeover:)

Thanks for stopping by,
Tiffany

Thursday, June 6, 2013

"Lucy is Enciente"


Where to begin...so much has happened in the last few weeks....


We've conquered our first family move into a lovely home and have begun renovation in the kitchen- more on that later...


"Ricky" just accepted a major job promotion yesterday as the Director of Clinical Education in his workplace- SO proud of him:) 


AND, we're expecting our 3rd little M later this year!!!

It's been a busy few weeks but we're so grateful for the faithfulness of God in every area of our lives:)

Can't wait to share more details on our DIY updating projects & my DIY maternity clothes, so stay tuned!

Tiffany