Pages

Monday, August 13, 2012

Jonah's 1st Birthday: Decor


This is my 2nd installment in Jonah's birthday preparations- once the invitations were finished, I moved onto my 2nd priority: decor.

First I tackled my pennant. Some time ago I purchased a pack of the 'Pawsitively Prints Designer Series Paper from Stampin' Up!, planning to scrap book for Jonah using the gender neutral patterns- out that came and I quickly discovered that the prints were perfect for what I had envisioned.

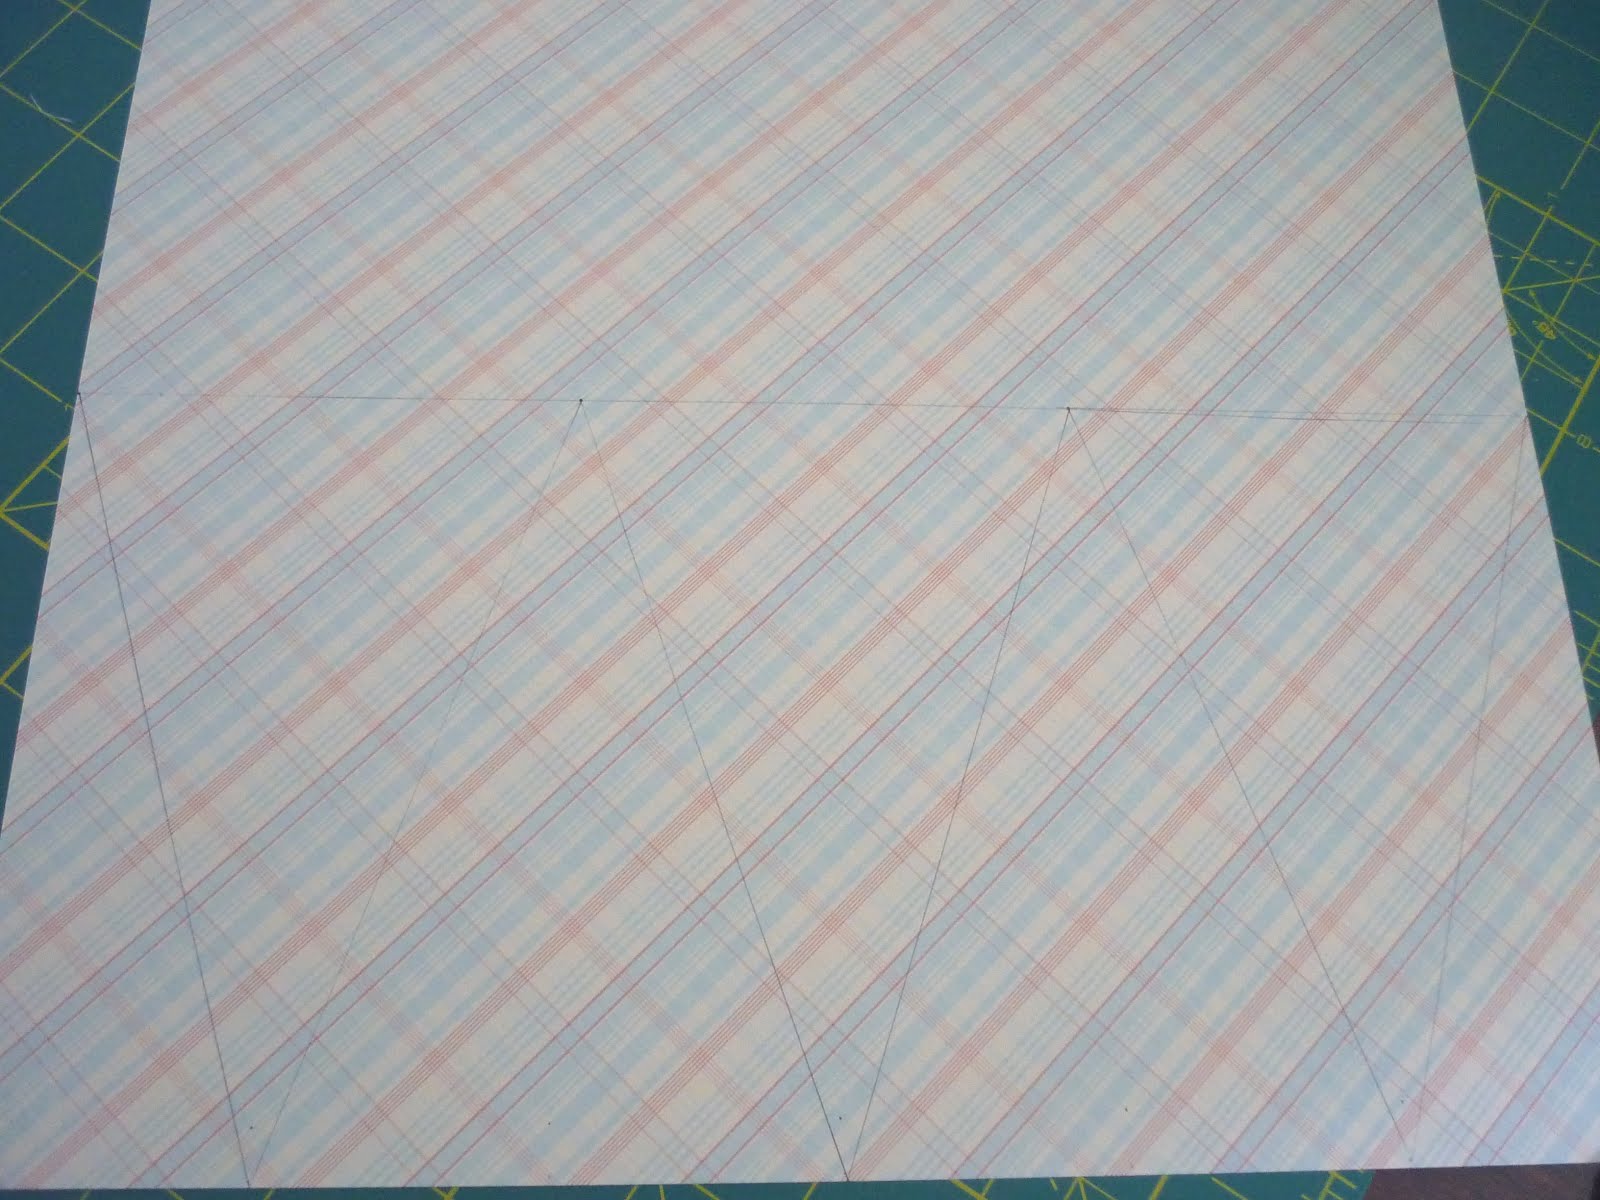
The pages were 12x12 so I managed to squeeze 10 pennant flags from each sheet with very little waste- I have plans for those scraps so actually there's no waste!

I marked (on the opposite side of what I wanted to showcase) 2 inch & 4 inch intervals and then drew connecting lines with a ruler- sorry the lines are so faint...look hard:)

A tabletop paper cutter made quick work of the pennant flags and in a short time I was ready to start the connection process.

I opted for metallic brads to attach the flags and quickly had everything connected and hung in place on the chicken wire panel being used:)

And finally, I added the letters & medallions using the Big Shot and presto, the pennant was complete:)

To complete the panel I added a copy of the Poky Little Puppy...

...and a handmade 'warning to puppies' sign, replicating the end of the story- I printed the sign on glossy card stock and attached to a paint stir stick:)

Next on the list was a paper chain. I cut 1"x6" strips of the Pawsitively Prints Designer Series Paper and attached the garland with a handy dandy glue stick.

And remember those scraps that I was saving? Well, I made a mini pennant using a punch to adorn the dessert buffet.
I simply sandwiched some natural linen thread between the mini flags and then tied the pennant to bamboo skewers. Easy:)

I also made a 2nd 'warning to puppies' sign to place on the front door with a few left over pennant flags- these were just quickly taped in place:)

During my search for additional decor ideas, I stumbled upon some fabric honoring the "Poky Little Puppy" and am toying with getting some to play with....later- there was just so much inspiration & so little time!

Thanks for stopping by- will share the next round of Jonah's birthday preparations tomorrow:)

Tiffany

Saturday, August 11, 2012

Ricardo Raves

Here at the 'Ricardo's' we're currently enjoying the following goodies- try 'em out if you haven't already:)

Annie's Organic Fruit Snacks:

Livy adores these and had no problem transitioning from 'the other' fruit snacks several months ago:) I recently scored with these all natural treats, finding them 75% off, hence why I stocked up! I've heard only great things from other kids munching away on these-they taste so yummy. And I love that they're colored with organic black carrots vs red dye # whatever- Livy loves every flavor of these "gummies":)

Mega Bloks:


Mega Bloks was another clearance find and has proven to be a keeper- though not advertised as teething apparatus, Jonah demonstrates their versatile functionality:)

While browsing our Kid to Kid resale shop last week, I happened to spot a large set (at least 100 pieces) and snatched them up to add to our collection- they're currently awaiting to be revealed at Jonah's birthday next week:)

Applegate Farms Hot Dogs:


In our family (like most), hot dogs are frequently enjoyed. Livy loves to sing the 'Hot Dog' song with Mickey Mouse and enjoys eating her "haw daw" even more:) I've tried multiple 'better' hot dogs and am really sold on this Applegate version- love that they're 'humanely raised' which I'm trying to pay closer attention to these days.


Jonah has just been introduced to the "haw daw".


He's loving the aspect of feeding himself, as am I:)


And thoroughly enjoys Livy's enthusiastic declaration of "Nonah ee haw daw too"! Livy has previously had some...negative digestive side effects...while consuming the 'other' kind of hot dogs- I love that she can enjoy one of her favorites treats with no digestive complaints while consuming/supporting Applegate products:)


GoGo SqueeZ Applesauce:
Link
Materne GoGo Squeeze™ Applesauce On The Go
No doubt you've seen GoGo sQueeZ applesauce by now- they're definitely on the rise. We discovered them at Costco before HEB even started carrying them and found that Livy loved them & they made the perfect 'on the go' snack. When I originally glanced at the label to check for questionable ingredients, I saw that it was '100% natural' + 'no refined sugar' and was sold. Upon further study, this wonderful product boasts the following, in addition to what I already listed:

1. Kosher certified
2. BPA free packaging (huge plus!)
3. Gluten & wheat free (fab!)
4. Vegan friendly
5. No added colors or flavors
6. No high fructose corn syrup

Wow. If I hadn't already been impressed, I certainly would now! They come in multiple flavors but so far, Livy is partial to the plain ol' apple.


She enthusiastically drains each last drop and often asks for a 2nd pouch and each pouch equates to 3/4 serving of fruit. Portable, fiber rich snack that tastes great- two thumbs up! Can't imagine running errands without these:)

Enjoying life each day:)

Tiffany

Friday, August 10, 2012

"A Painting Party?"

While chatting with friends last week, the subject of painting came up- one friend stated that she would gladly re-paint her house every day if she could while another stated that she lived with white walls as she hates to paint.

That about sums up, 'Ricky' and I...guess who loves to paint and who hates it?:)

Shortly after 'Ricky' & I got married, we did some painting in our home; the living room, guest bath and potential nursery were tackled as well as finishing out the garage (ugh). Painting our kitchen had been put on the back burner indefinitely, however, I suddenly wanted it done and as soon as possible! I'm blessed to have such an understanding and patient hubby- he agreed, sort of:) Thus, I began to tape off the kitchen & seemingly endless white walls...


...and remove electrical outlet covers. ***Don't skip this- we have in the past and regretted it.


'Ricky' was able to completely paint around the electrical sources with ease and once recovered, they look great:)

This project progressed over several days- painting with an almost 1 y/o and 'tornado' 2 y/o means you're racing to get as much done as possible during the 1 hour they both (hopefully) nap!

We called in some reinforcements too- Leyla graciously helped to tape and cut in part of the ceiling after a turkey sandwich and salt & vinegar chips to give her strength:)

With the kitchen almost completed (one wall left), I went to put Livy down for her nap and fell asleep with her! We awoke to find that hubby had finished all the painting and was doing touch ups in the living room (same color).


Livy of course insisted, "I hep, Dayi"!


The Minnie Mouse slippers helped, I think:)


We haven't done touch ups in the kitchen yet but here is our much improved kitchen wall color- warmer and more welcoming:)

A big thanks to hubby for shouldering most of the work, (especially as he hates painting) & to Leyla for her efforts in painting and watching the kids:)

This project gave me one more check to add to my 'to do' list- yeah! Maybe you've been procrastinating on a DIY project.... Better late than never, I say:)

Tiffany

Thursday, August 9, 2012

Happy to Be One!

What a joy to celebrate Jonah's 1st birthday today- I'll spare you my mushy sentiments about how time has flown by...(sigh).

With Jonah's party not till the weekend, I was so pleased to have a relaxing day at home with the kids where gifts appeared throughout the day and we enjoyed simple pleasures. Livy even 'baked' cupcakes for Jonah and sang to him- she insisted on 'blowing' out the candles herself though:)

And after naps, the kids were entertained with 'musical exploration' which is always a hit!

Livy is still determined to teach Jonah 'The Itsy Bitsy Spider':)

Life is packed with special moments- take time to enjoy them & thanks for stopping by:)

Tiffany

Wednesday, August 8, 2012

Handmade Birthday Gift: Part 3

Thanks for joining me for part 3 of Nicole's handmade gift: embellished flip flops!

I started with dark brown flops (they just look black!) from Old Navy based on the recommendation & blog tutorial that I followed. Then I cut "a 1, a 2, a 3, a 4..." 16 inch pieces of Pumpkin Pie grosgrain ribbon and ran a basting stitch (in orange this time) down the length of each piece of ribbon- pull threads (carefully) to ruffle:)

I did deviate from the tutorial for attaching the ribbon...

...I found it best to glue a tab with my handy dandy glue gun, attach with glue to the flip flop and then adhere the ruffled ribbon, ending with another glued tab.

The big brown button I chose to use (vs jewel in the tutorial) was plenty big to cover the tabs & I added a 'Sew Stitch' fabric covered brad (minus its legs) to the center to lend more interest...I hope:)

Repeat for the 2nd flop and ta da, they're done! I showed these to 'Ricky' and he said, "Nice. She can wear them for Halloween" and he was totally serious... (sigh).

While I did agonize over what to create for Nicole, I had a blast trying out new things and crafting a gift that was totally handmade and unique.

What are you crafting? Try incorporating something handmade into your next gift; a tag, gift wrap, a card, gift item etc.... I'm sure your recipient will be thrilled at discovering how you sacrificed your time to show them how special they are to you:)

And tomorrow marks the 1st birthday of our "Big O Boy" so I'm setting my projects aside to give him lots of lovies- take time to enjoy those you love:)

Tiffany

Tuesday, August 7, 2012

Handmade Birthday Gift: Part 2

Yesterday I shared part 1 of my handmade birthday gift for Nicole. Today I'm sharing part 2: handmade cards.

My goal with this project was to provide Nicole with plenty of handmade birthday cards.

This project took a good long while to complete since I designed as I worked and went back & forth, and back & forth, and back & forth about the designs! Thankfully Sweet Stamper was available, encouraging me to not despair & give up!

Keeping with my 'Sew Suite' theme, I used rub-ons for the stamped images, coordinating Designer Series Paper, coordinating buttons, punches and some Big Shot elements to lend interest...I hope:)

The envelopes received a few rub-ons too.

At the last minute I decided to sew up a mini tote to house the cards & envelopes, utilizing the same 'Sew Stitch' fabric.

I attached some velcro to keep the tote closed and ribbon tabs for easier opening- this was accomplished in a whirl so no comments about my messy stitching, please:) I was just trying to get it to stay together!

This concludes part 2 of my handmade birthday gift- tomorrow I'll be sharing the final part:)

Thanks for stopping by,

Tiffany

Monday, August 6, 2012

Handmade Birthday Gift: Part 1

This past weekend, the Ricardo's and extended family gathered to celebrate the birthday of my dear sister-in-law, Nicole- it was accompanied with the usual chaos and laughter of family gatherings:)

Earlier in the year, I purposed for the Ricardo's to give all handmade gifts this coming holiday season, so I decided to get a jump start with "Aunt Nicole" and try out a few of my many ideas for her birthday:)

After way too much time planning & ruminating, I settled on 3 things to accomplish:

1) Button jar with pin cushion top (inspired by Family Fun magazine article!)
2) Set of handmade cards
3) Embellished flip flops

I also wanted all 3 projects to be themed so I decided on the 'Sew Suite' fabric and card making supplies since I love them 'sew' much:)

For project #1, I gathered an array of Stampin' Up! buttons (of course), a ball jar, adhesives & pearl pins, a piece of the Stampin' Up! 'Sew Suite' fabric (button print) and 2 strips of the coordinating pom pom trim:) **Sorry there are no step by step pics for this project- I forgot!

Start by cutting a piece of fabric to exceed the circumference of the jar lid by approx 1/2 inch. Wad some batting underneath the fabric and position over the lid (minus the ring)- attach with adhesive to the back of the lid (be sure that the adhesive bonds to metal!), pinch in place and hold for a minute to ensure everything stays put.

Next place the ring on top of the jar, over the 'pin cushion' and screw in place. I added Sticky Strip around the ring to adhere the pom pom trim and stuck the pearl pins all over the top.

I love how this turned out- planning to make one for me next:)

Stay tuned for part 2 tomorrow: handmade cards.

Tiffany