Pages

Friday, August 31, 2012

So Tweet!


One of the items on my 'to do' list was to fashion a hair clip organizer/system for Olivia- it's ironic since she doesn't keep hair accessories in her hair for more than 5 minutes usually but still, I'm determined...

I started with this 'tweet' metal bird cage (flat on the back side) that I snagged at Hobby Lobby for 1/2 off making it just $7- matches Livy's room decor perfectly too:)


I then wound some of my Stampin' Up! ribbon in Pink Pirouette (still available) all through the slats- I wanted a care free, 'don't play by the rules' sort of pattern to mimic Livy's crazy hair vs 3 lengths just hanging down straight.


This allowed my to graduate Livy's clips in a more interesting pattern too:)


 So, here it is, chock full!  And some of Livy's 'plain Jane' clips are hanging in the silver organza bag as I ran out of room!  I still need to add the flower centerpiece to the top and trim the ribbons tails (which of course are not even as I was refereeing munchkins while working on this!) but Livy is quite enthralled with her new addition to her room and I'm thrilled to have a now empty drawer to fill...hopefully with toys perpetually on the floor!


Since I've not been impressed with the standard gerber daisy attached to 3 plain ribbons for a hair clip organizer, I was quite chuffed with creating something totally unique for my little pixie:)  Now we just need to tackle getting that little pixie to keep her clips in her hair, short as it it:)

*NOTE- will post a final picture when it's complete:)

Thanks for stopping by,

Tiffany

Follow Me on Pinterest button


Thursday, August 30, 2012

"It's Mrs. Trumball"


I count myself very privileged to have had a fabulous "Mamaw" in my life for so many years- she went to be with the Lord 3 1/2 yrs ago and I still miss her tremendously, however, she left an incredible legacy behind.

 'I Love Lucy' is unsurpassed in my books but it holds lots of sentimental significance too as 'Mrs Trumball' looks so much like my Mamaw- she even shares many of the same mannerisms:)  I feel as though Mamaw is in our home when I watch Mrs Trumball pop in & out of the Ricardo's, hence why these episodes are viewed often:)

One of countless things I associate with my Mamaw is her 'Meat & Rice', a simple, budget & kid friendly dish that my Mom made for us all through our growing up years- it was a standard favorite.  I haven't had any 'Meat & Rice' in years and while I've been gathering 'kid friendly' recipes (aka "Olivia friendly"), I suddenly remembered this...


As you can see, it was a hit & I was immediately transported back to childhood!  


And though the original recipe doesn't include green beans, I opted to sneak them in, hoping that Livy wouldn't mind as she's been on strike from green veggies of late...worked like a charm, making me one happy Mama:)

Be sure to try this out for your family- it's very forgiving so you can switch things up as needed:)

Mamaw's Meat & Rice:

1 1/2 lbs ground beef
3 cups tomato sauce
1/2 cup butter
4 tbsp grated onion
1 1/2 cups cooked rice
1 tsp salt
1 tsp dried thyme

Saute onion in butter and then brown beef while rice cooks.  Combine all ingredients and place in a greased casserole dish and bake at 350 degrees for 30-45 minutes.


*NOTE: Since I was making this for Livy & Jonah I omitted the butter & onion and simply browned my beef and added extra thyme.  I used the Pomi tomatoes which come in a cardboard carton (no BPA!) and measure 3 cups exactly, so very convenient:)  Adjust seasonings to your liking & enjoy!

Tiffany

Tuesday, August 28, 2012

Squeaky Clean Dishes


Hubby and I have had an ongoing discussion over the past months about my 'all natural' implementations- what should be implemented and what should be "left alone".  We've agreed on most everything and had no outbursts over borax and honey...just my olive oil eye makeup remover..."You smell like a salad!":)

So as we neared the end of our massive Costco container of Finish dishwasher tablets, I decided to try my hand at making my own!  I found my inspiration here and have been using the following recipe for the past 3+ weeks and love it!  Even "Ricky" has no complaints, so that makes this is a real winner:)


Here's what I mixed up in my now empty Finish container:

2 cups Borax
2 cups Washing Soda
1 cup Kosher or Sea Salt (I used Kosher as that's what I had on hand)

3 Tbsp Citric Acid (I discovered it in bulk at Sprouts and just filled up a little baggie of it- easy!)
30-50 drops of Lemon Essential Oil (I went a little crazy...less is more!)

One heaping Tbsp + white vinegar in the rinse port =


Squeaky clean dishes!!!


And yes, I'm recycling a formula scoop- it's perfect!

A few things to remember when going natural:

I generally scrub debris from my dishes before loading the dishwasher- this alleviates baked crusties:)  I've noticed the natural mix is more gentle but still cleans as well as the Finish tablets and way better than the expensive Cascade Complete Packs:)  I tested the mix by leaving some egg, cheese etc... on some dishes before running the dishwasher...when unloading I saw that the dishes weren't totally spotless...they weren't when using the Finish/Cascade tabs either...moral of the story = rinse your dishes!

If  I have an extra big load of dishes to run or they're especially grimy, then I add a wee bit more powder and the dishes come out great.

Thus far, I haven't discovered a perfect dishwasher cleaner so there may be some occasional spots on your food processor, a glass etc...  but for me, I'm happy to wipe a few water marks and know that Livy & Jonah won't be harmed, if by some chance they decided to munch on this stuff vs the conventional detergents that are poisonous!  I can handle a potentially upset tummy vs death!

Now don't you feel motivated to make your own dishwasher detergent?:)  Live smarter, save money and have peace of mind while your dishes get squeaky clean:)

Thanks for stopping by & let me know if you have any questions...I've done quite a bit of reading on this:)

Tiffany

 Follow Me on Pinterest button

Monday, August 27, 2012

Party Pretzels

It's Monday and unlike some, I love Mondays as they mean getting things back on track with the kids & the house and getting much accomplished, hopefully:)

As usual, we had a busy weekend and one of the activities included hosting a birthday party for Leyla, celebrating 16 years of her precious life.  It was executed in a bit of a whirl but I did manage to dip some pretzels to add to the table of goodies.

Dipped pretzels are such a fun & easy treat and have become a favorite of Livy's, my pretzel queen:)


To accomplish, simply choose your favorite brand of pretzel rods (Snyder's for us) and dip in melted chocolate- I melt chocolate chips in a handy dandy 'double boiler' aka heat proof bowl set over a saucepan with an inch of simmering water.

Once the chocolate has completely melted and is smooth, dip away and roll in your favorite edible party decor- we've used sugar stars, nonpareils, colored sugar and mini chocolate chips:)  *TIP: use white chocolate for colored sugar!


Livy enjoys smelling her food to ensure it's not poisonous... (sigh)


One nibble to start things off...


And thumbs up for a great treat!  Olivia & I would love to have you try these too- they're sure to be a grand success:)

Making your day a little sweeter,

Tiffany


Thursday, August 23, 2012

"Say Aaahhhhh!"

The kids & ( were delighted to have Granddaddy drop by for an impromptu visit this morning- we had just taken a walk and were in the throws of bath time when he popped his head in to receive squeals of joy!

In return for stopping by, I loaded Granddaddy up with a coffee & apricot square while he snuggled with Livy to watch I Love Lucy episode, 'The Camping Trip'- Livy loves to mimic Lucy as she says "Say aaahhh" when hooking fish together on a string!  Jonah opted for a nap:)


So while listening to Lucy & Livy "Wah wah, wah wah" while hunting for ducks, Granddaddy happily munched away and gave his enthusiastic thumbs up for the apricot bars.  These apricot squares are seriously good and since they use dried apricots vs fresh, they can be made during 'any season':)

This recipe was on my list of things to bake this summer & it's definitely a keeper.  A bonus to this recipe is that it doesn't require a mixer, just your handy dandy food processor which then promptly goes in your handy dandy dishwasher for easy clean up:)


(I'm afraid the above bar had already been nibbled by the time I remembered to take a pic!)

All Season Apricot Bars

Crust:
1 1/2 cups all purpose flour
1 1/4 cup sliced almonds, + 1/2 cup
1/3 cup granulated sugar
1/3 cup firmly packed light brown sugar, + 1Tbsp
1/2 tsp salt
12 Tbsp unsalted butter, cut into 12 pieces and softened

Filling:
1 lb dried apricots
1 cup water
1/2 cup apricot jam
1/2 tsp grated fresh lemon zest
1 tsp fresh lemon juice

1) Adjust oven rack to middle and preheat to 375 degrees.  Line a 9x13 baking pan with aluminum foil sling and grease.
2) FOR THE CRUST:  Process the flour, 1 1/4 cups almonds, granulated sugar, 1/3 cup brown sugar & salt in food processor until combines, approx 5 secs.  Add the butter and pulse until it resembles coarse meal with a few pea sized pieces of butter, about 20 pulses.
3) Reserve 1/2 cup flour mixture for the topping.  Sprinkle remaining flour mixture in bottom of prepared pan and press into an even layer with the bottom of a measuring cup.  Bake the crust until golden brown, about 15 mins.
4) While the crust bakes, mix remaining the 1 Tbsp of brown sugar and 1/2 cup of almonds with reserved flour mixture in small bowl and pinch to form clumps of streusel.
5) FOR THE FILLING: Pulse the apricots, water and jam in food processor until roughly 1/4 inch chunks.  Cook the apricot mixture in a large non stick skillet over high heat until it is thickened and jam-like, about 10 minutes.  Off the heat, stir in the lemon zest, lemon juice and a pinch of salt.
6) Spread the cooked apricot mixture evenly over the hot crust, then sprinkle with the streusel topping and remaining 1/2 cup almonds.  Bake until the almonds are golden brown, about 20 mins, rotating the halfway through baking.
7) Let the bars cool completely in the pan, set on a wire rack, about 2 hrs.  Remove the bars using the foil sling and cut into 24 squares.

Enjoy!

Tiffany

Tuesday, August 21, 2012

"May I?"


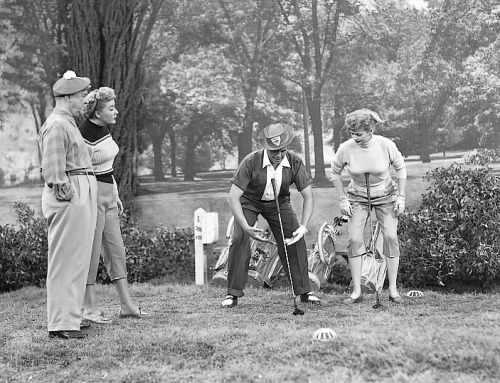
In 'I Love Lucy' episode, 'The Golf Game' Ricky & Fred mischievously teach the girls how to play golf, implementing bogus rules, such as "May I?" before taking a shot!  The girls, totally duped, faithfully leap frog across the green in an effort to play like professionals and swing with much gusto attempting "Stymies" and avoiding "Mashies"!


This past week I purchased a 'cheesy' plastic golf set from the the HEB clearance section for a whopping $3- it was hidden for a 'rainy day' which came that same week!  Once unveiled, this golf set provided 5 hours of almost disaster free entertainment for the kids, no joke!  Olivia could barely bring herself to part with her golf "cub" at bedtime & Jonah tirelessly went searching for the golf balls under the couches, "about a hundred" times:)


I'm continually amazed at how observant children are and was curious to see if Olivia remembered watching Lucy play golf since we hadn't viewed the above episode in awhile...when asked if she was playing golf like Lucy, she calmly stated, "Ess".  I think she must be right as she mimicked some of Lucy's best golf moves, including a "Dormie"!


Enjoy the day:)

Tiffany

Monday, August 20, 2012

Going Once, Going Twice


This past week, the kids & I enjoyed watching 'Lucy Hires a Maid' in which Lucy employs the infamous, Mrs Porter.  Ricky exhorts Lucy to "be firm" & "let her know who's boss" to which Lucy halfheartedly agrees.  The trouble peaks when Lucy doesn't have the nerve to "fire her" after "being eaten out of house & home"!

I was ruminating over Lucy's lack of resolve to stand up for herself and did a mental status report for myself.  Believe it or not (and I don't think 'Ricky' does!), I have previously struggled much in this area...not so much now though.  I attribute this process of evolving to more life experience, getting married, becoming a mother and running on less sleep:)

 For example, last month I purposed to swing by Baby Gap to check out any potential bargains (consistently find incredible deals here!) and after a few minutes, maneuvered to the register and asked the cashier to run some price checks (#1 rule to shop by: always price check!)...he happily obliged and as he read the prices to me I cast my vote.

                                     
When the cashier read the price to a 'final sale' item (linen shirt for Jonah that I really wanted), I looked at the item again, sighed and said, "Nah".  The cashier calmly said, "What if I lower the price some more?"  I was totally intrigued now & though I rarely sport a successful poker face, nonchalantly responded, "Like how much, cause I'm thinking I'm going to have to iron that so you'll have to make it worth my time".  I was a bit stunned that I actually said that but felt really good because it was true!!!  Now with endorphins pumping & my curiosity peaked, the cashier chuckled over my response (am I the only person that irons baby clothes?  Surely not...) and quoted almost half of the 'final sale' price!  Again, attempting to remain calm (while on the inside I was jumping up & down!!!), I scrunched up my pondering face, paused, sighed and said, "...ok":)


 We bartered over another item, agreed on several others & I literally left Baby Gap that day grinning from ear to ear, having learned a valuable lesson: stick to your guns & try to deal with the manager on duty:)  I really wanted the linen shirt for Jonah (which he wore for his birthday party!) but knew that the price was more than I could live with so I was willing to leave it behind.  If the cashier had not bartered I would have survived but I learned that retail prices are not always what they appear:)

Be willing to ask the hard questions, like, "Is this the final price"?  In my case I didn't need to ask Mrs Porter if "she's a good cook, if she has a catcher's mitt" etc... but since the above experience, I've found myself confidently asking for possible price changes and am amazed at how often I'm met with success (just think how many times I could've saved more during previous shopping ventures!).

The journey to standing up for ourselves is a long road for many of us and one that encompasses so much, such as hiring a maid & even shopping for kids clothes:)  At times I remind myself to stand up straight, face your current challenge and stick to your guns aka "Is this the final price?"! 

Hubby & I are currently using this tactic as we tackle some poor sleep patterns with Olivia (like climbing into our bed every night!) as well as budget cuts etc....

This week, instead if hatching a "plan to make Mrs Porter quit", expect the unexpected as you stick to your guns!

Thanks for stopping by,

Tiffany


Friday, August 17, 2012

Homemade Toothpaste @ the Ricardo's

I wanted to provide an update on my homemade toothpaste- in the above pic it's in liquid form; once it sits for an hour or so, it will firm up as long as it's not sitting next to a window, in sunlight etc....

All four members of the Ricardo household are now successfully using this handy dandy toothpaste! The kids love it which is what I hoped for & hubby has issued no complaints and acclimated well, despite his misgivings of its effectiveness:)

User Tip: I found my mouth going through detox/cleanse for the 1st 2-3 days and then dramatically improved with my breath being much better and my teeth feeling squeaky clean! Whenever transitioning from a commercial product to all natural, give yourself a grace period to allow proper detox. Don't just give up!

I'm now thrilled to discover that my mouth doesn't feel...well, I'll spare you the details... if I miss brushing in the morning (just saying...it happens sometimes!) like it did when using commercial toothpaste.  The 2 major factors I had to adjust to with my homemade version were: lack of minty taste & foamage- it seemed that psychologically these equated to cleanliness & yet once I got over that mental hurdle, I've loved my handy dandy toothpaste!

My Mom aka Sweet Stamper requested a trial batch and is loving it- I promise you will too:)

Let me know if you have any questions & pamper your teeth with some handy dandy coconut oil- they'll brighten up & thank you:)  ***See the recipe in my original post above.

Tiffany

Thursday, August 16, 2012

Uniform to Unique


Sometime back, I was browsing online for clothing bargains & found this 'school uniform' dress on clearance- I've had great success with their products so I opted to get this in hopes that I could embellish it (packing creases still visible!). I think I paid a whopping $4- big spender


When rummaging through my growing stash of fabric, I discovered a design from Stampin' Up! that matched perfectly- this floral piece (part of a trio of patterns called 'Twitterpated") was free with a purchase, adding to my delight:)


So, with a little brain storming and welcome advice from my sewing gurus, Sylvia & my Mom, I decided on a shabby ruffle and flowers, transforming this little blue uniform to something special & unique:)


This came together in a snap too (even better!) & Livy is thrilled to have another dress in her closet...of dresses:)


I bought the dress big, so Livy will be able to wear it next spring & by then I should have her matching hair accessory finished!


Livy insisted on wearing her sparkly black shoes to try on her new dress- ignore the backdrop of chaos...my patio herb garden is under construction:)

Thanks for browsing,

Tiffany

Wednesday, August 15, 2012

Jonah's 1st Birthday: Desserts

Hello All- today I'm sharing part 4 of Jonah's birthday preparations: the sweets!

I've recently been very outspoken (I know...shocker) about how I despise buying disposable products: ziploc bags, paper napkins, paper plates and many more. With birthday prep in full swing however, I faced how deeply devoted I was to keeping the budget for my 'Poky Little Puppy' party at almost zilch- buy disposable plates/cups etc... or not???

Always ready for a challenge, I plunged ahead, firmly deciding NOT to buy disposable (deep breath)...so what to use instead???

And then it hit- I brainstormed to re-use all of Jonah's baby food jars as dessert cups- this would save me buying something disposable (I can see Betsy grinning already as she's heard my recent tirades about disposable products that have wreaked havoc on my grocery budget!!!)

The baby food jars would be fabulous containers to house my 3 proposed desserts and be just the right size for little puppies:) ***I haven't seen anything like this even on Pinterest so I'm hoping this will inspire you:)

Poky Little Puppy Dessert #1: Rice Pudding:


I served the rice pudding cold (it was 100 degrees outside!) and topped with orange sugar crystals- this transported me right back to childhood:)

Here's the recipe for Stovetop Rice Pudding (courtesy of Cook's Country):

Ingredients:
2 cups water
1 cup long grain rice
1/4 tsp table salt
4 cups whole milk
2/3 cup sugar
1 1/4 tsp vanilla

Directions:
1) Bring water to boil in large saucepan; stir in the rice & salt. Cover, turn the heat to low and simmer, stirring occasionally until water is almost absorbed, approx 15-20 minutes.
2) Microwave the milk until steaming, approx 1-2 minutes. Stir the hot milk & sugar into the rice and bring to slow simmer. Cook, uncovered, stirring often until the mixture is thick, approx 45 minutes.
3) Off heat stir in the vanilla. Let the mixture cool slightly before serving or refrigerate until chilled, approx 2 hours.

Poky Little Puppy Dessert #2: Chocolate Custard


My Mom aka Sweet Stamper graciously offered to help me out by making these and they were delish! An old fashioned recipe, freshly whipped cream and blue sugar crystals= fantastic!

With all the hullabaloo, I neglected to snap a pic of the Strawberry Shortcake, Poky Little Puppy #3 dessert- they were little bites of cream cheese pound cake topped with strawberries, freshly whipped cream & pink sugar crystals housed in a huge picnic basket...

...Jonah is digging into the strawberry shortcake here and getting the hang of using a spoon:)

Here's the recipe for the Cream Cheese Pound Cake- always a hit!

Ingredients:
1 (8oz) pkg cream cheese, room temp
1 1/4 cups butter, room temp
6 large eggs, room temp
1/4 cup buttermilk, room temp
3 cups all purpose flour
3 cups sugar
1 tsp vanilla

Directions:
1) Preheat COLD oven to 325 degrees. Grease & flour a 10 inch tube pan.
2) In large bowl, cream butter & cream cheese until smooth. Add sugar gradually and beat until fluffy.
3) Add eggs 2 at a time, beating well with each addition. Add buttermilk & vanilla & blend.
4) Add flour all at once & mix until just combined. Pour into prepared pan & bake for approx 70-80 mins or until toothpick comes out clean.


I did take the trouble to dip some pretzel rods with semi sweet choc and then dust with sugar stars- it only took a few minutes & they've been a huge hit...Livy eats the choc end and Jonah eats the plain end:)

I also dipped some strawberries as I had extra on hand and they made for an additional sweet GF option- the acacia platters were another thrift find...this platter was a whopping $0.99:)

And remember my post about dearest Megan in Wales and how I entreated her help for Jonah's birthday? Well, my cry for help was for teaspoons- Brits use proper teaspoons for the endless amount of hot drinks consumed and these little cutlery items are a rarity here in the U.S. I knew they would be the perfect size for my baby food jar treats so I had them sent all the way from Wales for this special occasion:)

And that completes our home birthday preparations for Jonah's 1st birthday. It was worth every moment and all the sacrifice of sleep & time- thanks to all who participated with us:)

I'm already looking forward to planning Livy's next birthday (will be her 3rd) and now have more experience at party planning/hosting resulting in less fuss and more fun for all:)

As always, thanks for stopping by,

Tiffany

Tuesday, August 14, 2012

Jonah's 1st Birthday: Table etc...


Happy Tuesday, everyone- today I'm sharing more details from Jonah's 1st birthday: table decor etc....

When first studying my original inspiration for Jonah's theme, I took note of the host using her own existing stash of Golden Books and children's decor and decided that I would endeavor to replicate this.

First, I called Gramma and asked if she had access to any of our childhood books- she did and deposited a box full! I had a blast walking down memory lane as I perused favorite titles such as, "We Help Mommy"- loving this whole 'free decor' thing:)


I set out to showcase multiple favorites on the dessert table and also in a discreet (aka away from little hands) area- my brothers enjoyed seeing our much loved and worn books on display:)


In my inspirational layout I noted the use of classic toys interspersed with the Golden books and replicated with rubber ducks, a classic Pooh Bear jack-in-the-box and rubber blocks, all of which we had on hand:)


No birthday is complete without balloons so hubby graciously blew up some mammoth, helium quality balloons that my puny lungs couldn't handle! And since the walls were freshly painted I used thumb tacks to attach the balloons to limit any signs of destruction:)

Now for the table:

I laid out some of my baby Beatrix Potter bowls that added sentimental charm, along with the treasured Golden Books:)


It seemed to me that the Poky Little Puppy would've used a red & white checked napkin if he needed to wipe his little paws, so I set out to get some- after coming up dry in my attempts to purchase these I bought some fabric and stitched them up in a hurry. They came out to a slightly larger cocktail size- perfect for little paws:)

I wanted to highlight some classic, old fashioned candy and scored with finding "Bit O Honey" on clearance- they were housed in old mason jar mugs and held the mini pennant in place:)

I had the respective dessert flags housed in jars containing gum balls, peanut M&Ms and little golden wrapped Werther's (milk choc & caramel swirled truffles which I'd never seen before).

Water bottles were given a lightning fast makeover: I set hubby to tearing off Ozarka labels while I ran to my tabletop paper cutter and snipped some strips of the Pawsitively Prints DSP to form belly bands and no, they weren't perfect (cut them a little short in my haste) but they worked!

And for the guest treats, I broke with convention and didn't assemble 'goody bags' (gasp!) and forged ahead into the unknown and chose to be innovative..ish:) I simply didn't have the resources/time to make what I would've liked and I remembered seeing a blurb on another 'Mom blog' of having her son's friends choose toys from a big basket and what a time saver it was...hmmmm.

Thus I popped pinwheels (loved these & ran out of time to make any!) from Rose's birthday in my little wooden crate ($0.49 thrift find!) with Golden Books, Annie's treats and handmade "snack sacks" as I'm calling them.

Well, I don't know how much of a time saver this endeavor was since I decided to make reusable "snack sacks"... missed several hours of sleep but they were worth it:) I followed this tutorial and didn't run into any major snags- planning to make more for Livy & Jonah:)

***NOTE: I did a TON of research about appropriate materials for reusable food bags; for these I chose an organic hemp + organic cotton blend for the lining. Hemp is evidently known for it's extra 'clean' properties and organic cotton is highly recommended for any kind of food lining. If you want more info on this particular journey of research, just let me know:)

Thanks for looking,

Tiffany